Friday, April 29, 2016

Difference between sharepoint hosted app and provider hosted app

The following is kind of cheat sheet that points out the different between SharePoint hosted and Provided hosted apps / add-ins.

Note: Microsoft has deprecated the use of custom managed code within the sand-boxed solution in SharePoint 2013 and introduced SharePoint App model as replacement. The app model decouples the SharePoint core product from app run-time which gives ability to the user to run the code from any environment.


SharePoint Hosted
Provider Hosted
No server side code, 100% client side code
Managed code and high trust
Can be developed using HTML5, CSS, JavaScript, jQuery, ASP.NET Ajax, CSOM, REST API, Silverlight, KnockOut JS, Angular JS
Any programming language can be used
Data Storage Locations: SharePoint Online, Content Database
Data Storage Locations: ISV Storage, Azure Storage, Content Database.
(ISV - Independent Software Vendors)
Start Page Location: On-Premises, SharePoint Online
Start Page Locations: ISV Hosted web site, SharePoint Online, On-Premises SharePoint Online, On-Premises
Can be hosted on either SharePoint on-premises or office 365
Deployed outside  the SharePoint farm
Business logic is JavaScript on custom SharePoint pages
Business logic is mainly remote server-side code.
SharePoint add-in model does not allow managed code to be installed directly on SharePoint, however it can be hosted in application server and a separate website (eg. on IIS).  
App usage scenario: An add-in that includes a people picker control and that stores information about SharePoint users in a SharePoint list
App usage Scenario: Can be used in situations where SharePoint being consumed as service and/or hosted by a provider. App model is the option if you do not have a on premises installation. Go with this option when you require server-side managed code.
App Components are SharePoint components like SP Features, Custom Actions, Lists, Site Columns, Content Types, BCS models(web scoped), Web and list templates
Can connect to any internal or public web service
SharePoint-hosted SharePoint Add-ins do not support event handling,
To handle list and list item events, you need to create remote event receivers (RERs), which are web services that run externally to the SharePoint farm or SharePoint Online.
This add-in components are hosted in the isolated add-in domain of your SharePoint farm
Can be hosted in any web server or hosting service
Authentication: This uses the privileges of the signed in user
Authentication: Uses OAuth or the JavaScript cross-domain library
CRUD Operations: You can use either the REST/OData web service or one of the client object models in SharePoint 2013.
SP.js is available to perform create, read, update, and delete (CRUD) operations on SharePoint data.
CRUD Operations: You can use the REST/OData endpoints in SharePoint 2013 to perform create/read/update/delete (CRUD) operations on data in the add-in web
These apps don't work with SAML Claims authentication provider with ADFS 2.0
Any SharePoint component that can be in a SharePoint-hosted add-in can also be in a provider-hosted add-in.


Wednesday, March 16, 2016

Uncaught TypeError: SP.ProxyWebRequestExecutorFactory is not a function

Environment: Office 365, SharePoint Online, Visual Studio 2015, SharePoint JSOM


Scenario: Create a SharePoint hosted app to get the SharePoint list details from the root web.

Error: Uncaught TypeError: SP.ProxyWebRequestExecutorFactory is not a function


Code snippet where the error has occurred is marked in red


   hostwebUrl = decodeURIComponent(getQueryStringParameter("SPHostUrl"));
   appwebUrl = decodeURIComponent(getQueryStringParameter("SPAppWebUrl"));
   context = new SP.ClientContext(appwebUrl);
   factory = new SP.ProxyWebRequestExecutorFactory(appwebUrl);


Troubleshooting: According to this article, SP.ProxyWebRequestExecutorFactory is member of Request Executor(sp.requestexecutor.js). So the script file should be loaded explicitly in order to avoid the error.


Fix: Reference the SP.RequestExecutor.js in the page
<script type="text/javascript" src="/_layouts/15/SP.RequestExecutor.js"></script>


Thursday, February 18, 2016

Deployment to resource group ‘Resource Group Name’ failed in Windows Azure

Environment: Windows Azure

Requirement: Create a SharePoint Server 2013 trial Virtual Machine in Azure.

Error: Deployment to resource group ‘Resource Group Name’ failed.

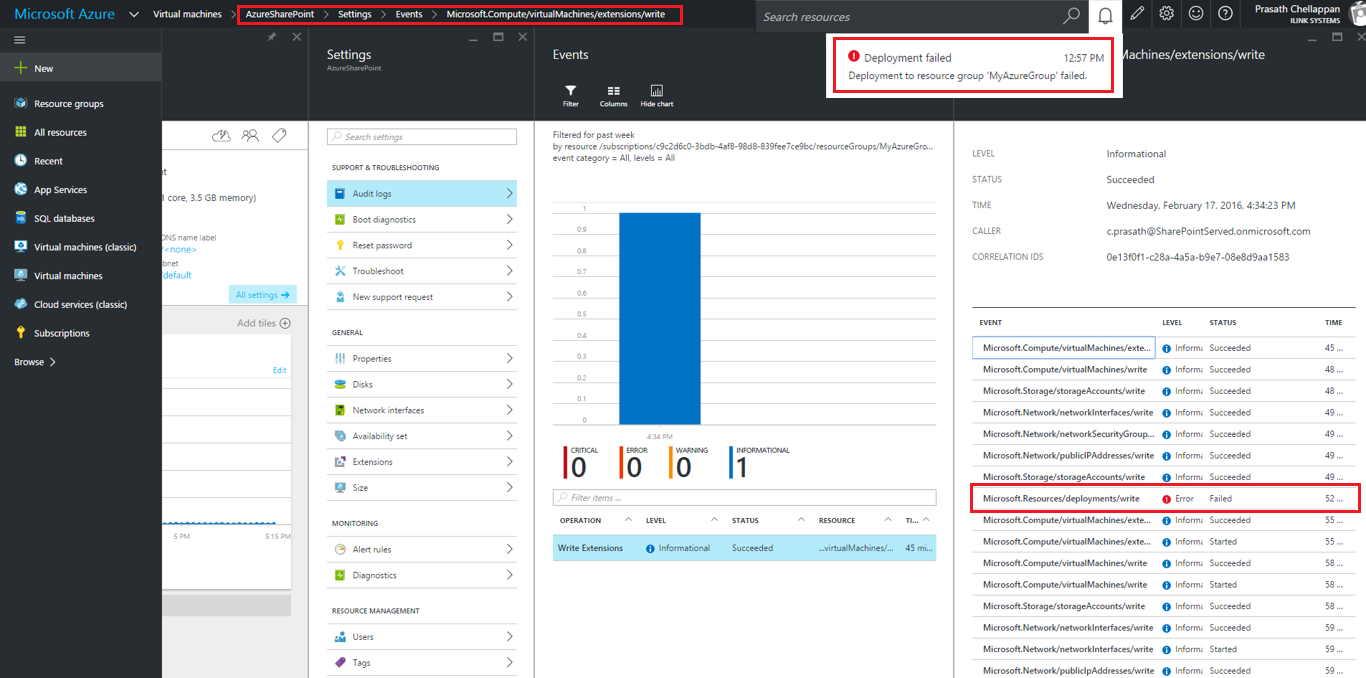
Issue: The deployment failed with the following an error at event Microsoft.Resources/deployments/write

Deployment failed error

Troubleshooting: From the audit log detail, it is understood that this is an authorization error. The credentials that are provided during Virtual Machine configuration does not have permission to access the virtual machine.

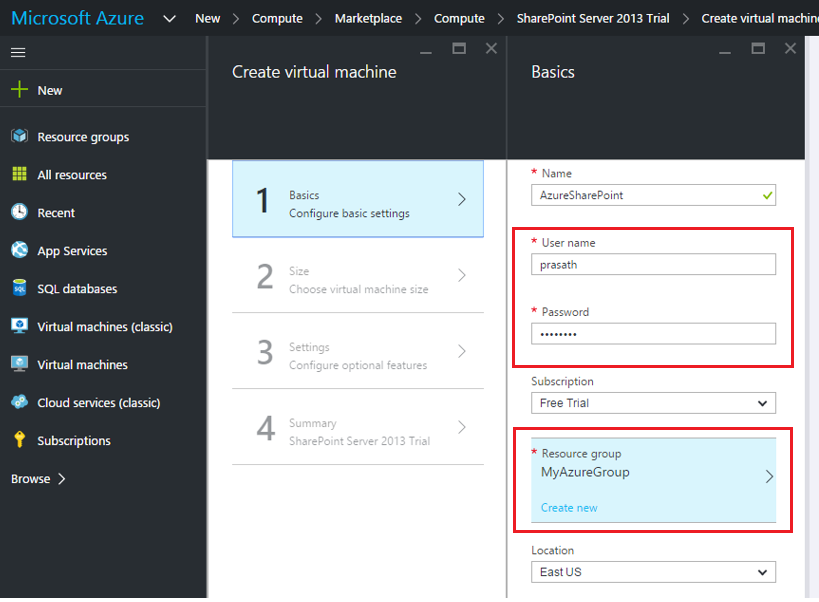
Following is the screenshot of the page that is used to set the credentials while creating virtual machine. The issue was because the user 'prasath' does not below to 'MyAzureGroup' resource group and not granted any permission/role.

Create Virtual Machine

Resolution:
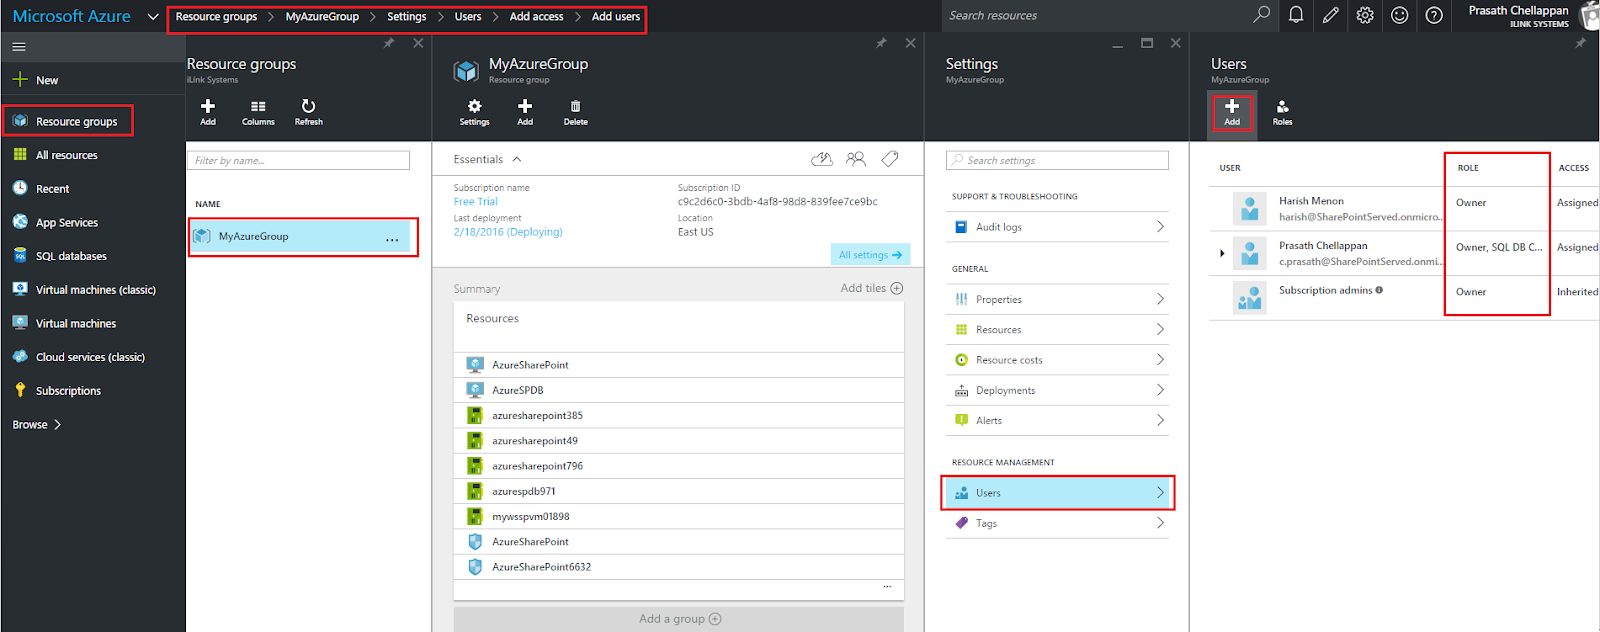
  1. To resolve this issue, from Azure portal home page, select the Resource Groups menu from the quick launch.
  2. Select the appropriate Resource Group
  3. Select Users from the settings panel
  4. Click Add from the Users panel
  5. Click Select a role from Add Access panel
  6. Select Owner from Select a role panel
  7. Select the user name to whom you want to grant permission to login to virtual machine and set them with appropriate role.

Permission Settings

After the above changes, recreated the virtual machine and the deployment when successfully without errors.

Tuesday, February 2, 2016

Develop SharePoint-hosted SharePoint Add-in to get user's permission at the site level

This article is a basic example of developing a SharePoint-hosted SharePoint Add-in and deploying to SharePoint online site

Source Code

Environment: Office 365, SharePoint Online, Visual Studio 2015, JSOM

Prerequisite: Active users are added to the Office 365 site and granted permission to access the SharePoint online.


Requirement: Develop a SharePoint-hosted SharePoint Add-in to get user's permission at the site level

Solution:
Create the add-in project


  1. Start Visual Studio
  2. Choose File > New > New Project.
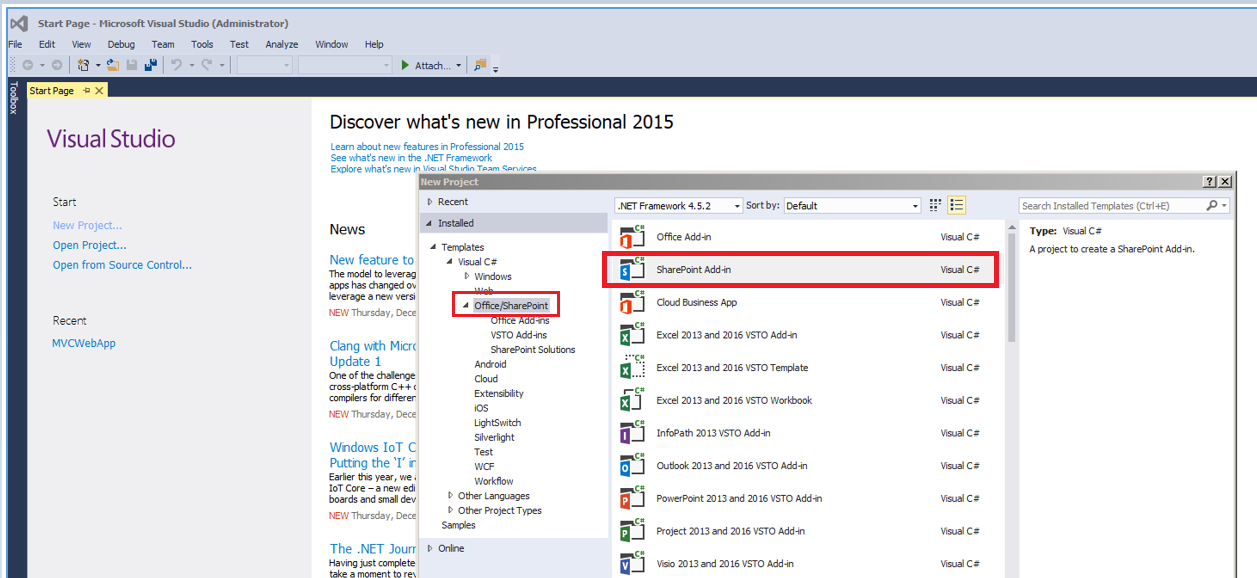
  3. In the New Project dialog box, expand the Visual C# node, expand the Office/SharePoint node, and then choose Add-ins > Add-in for SharePoint.
  4. Name the project, and then choose OK.


Create SharePoint Add-in using Visual Studio


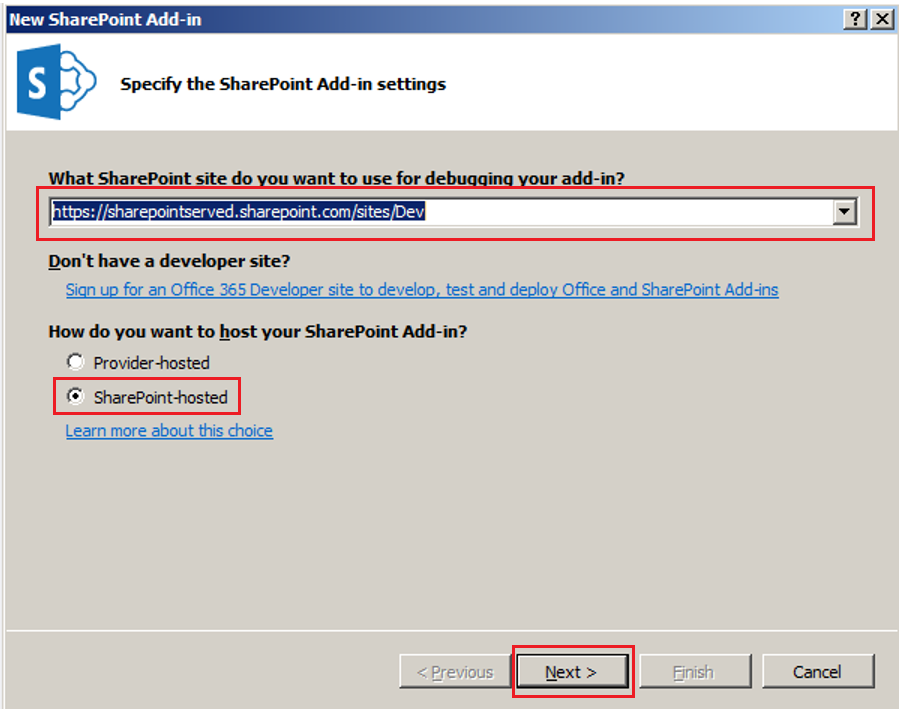
  1. Specify the Add-in for SharePoint Settings dialog box, provide the full URL of the SharePoint site that you want to use to debug your add-in. This is the URL of the Developer Site. (Use HTTPS, not HTTP in the URL.) Under How do you want to host your SharePoint Add-in, choose SharePoint-hosted. Choose Finish.


Specify the SharePoint Add-in settings.


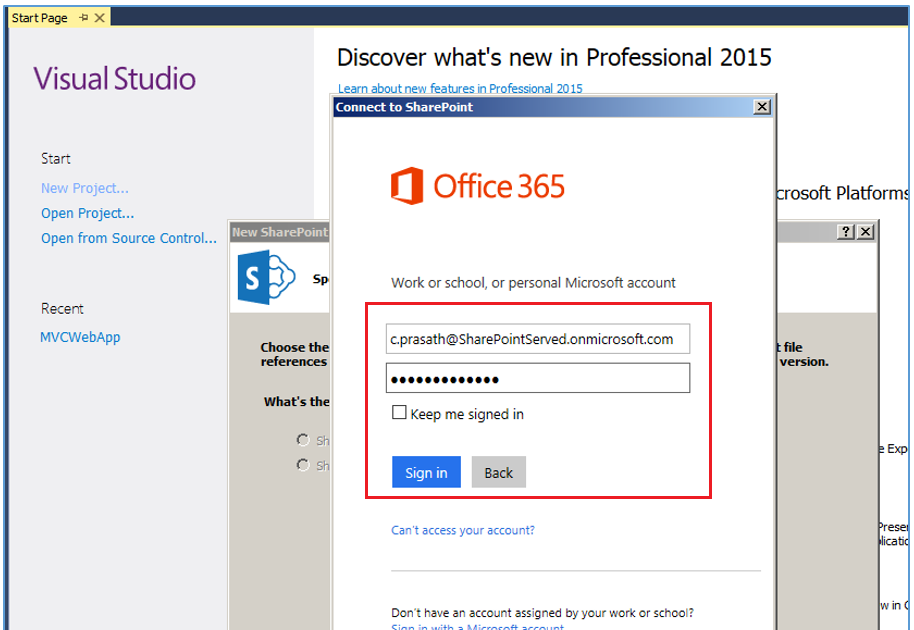
  1. Provide your subscription administrator's credential if prompted to login to your Developer Site.


Connect to SharePoint


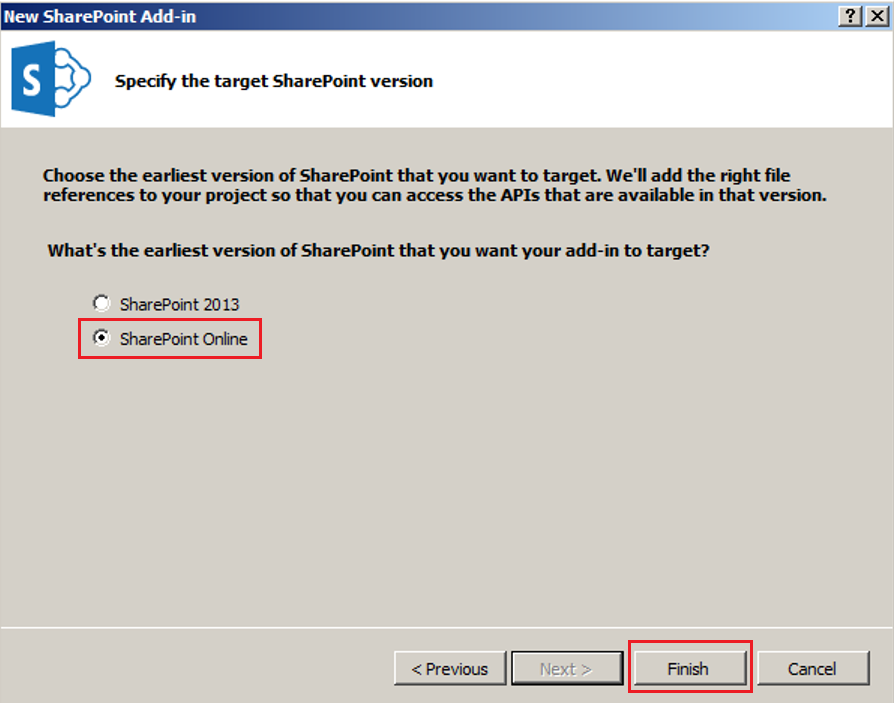
  1. In Specify the target SharePoint version page, select SharePoint Online, and then click Finish button


Specify the target SharePoint version


Code your add-in


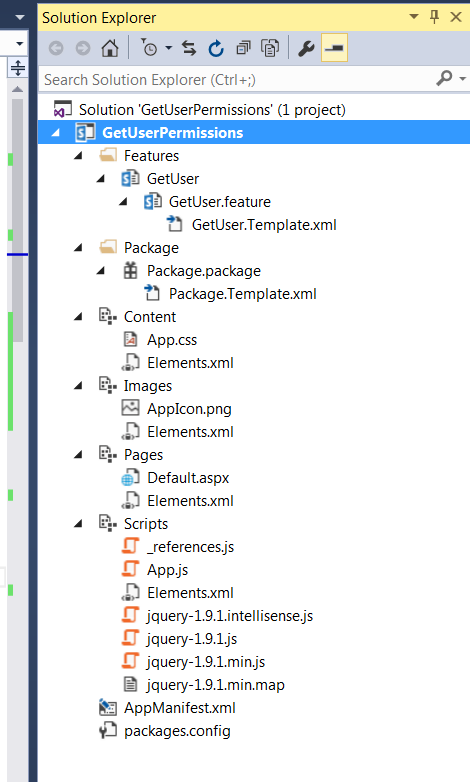
Following is the project items created by default template. Refer to this MSDN article for more information about each project item
Solution Explorer


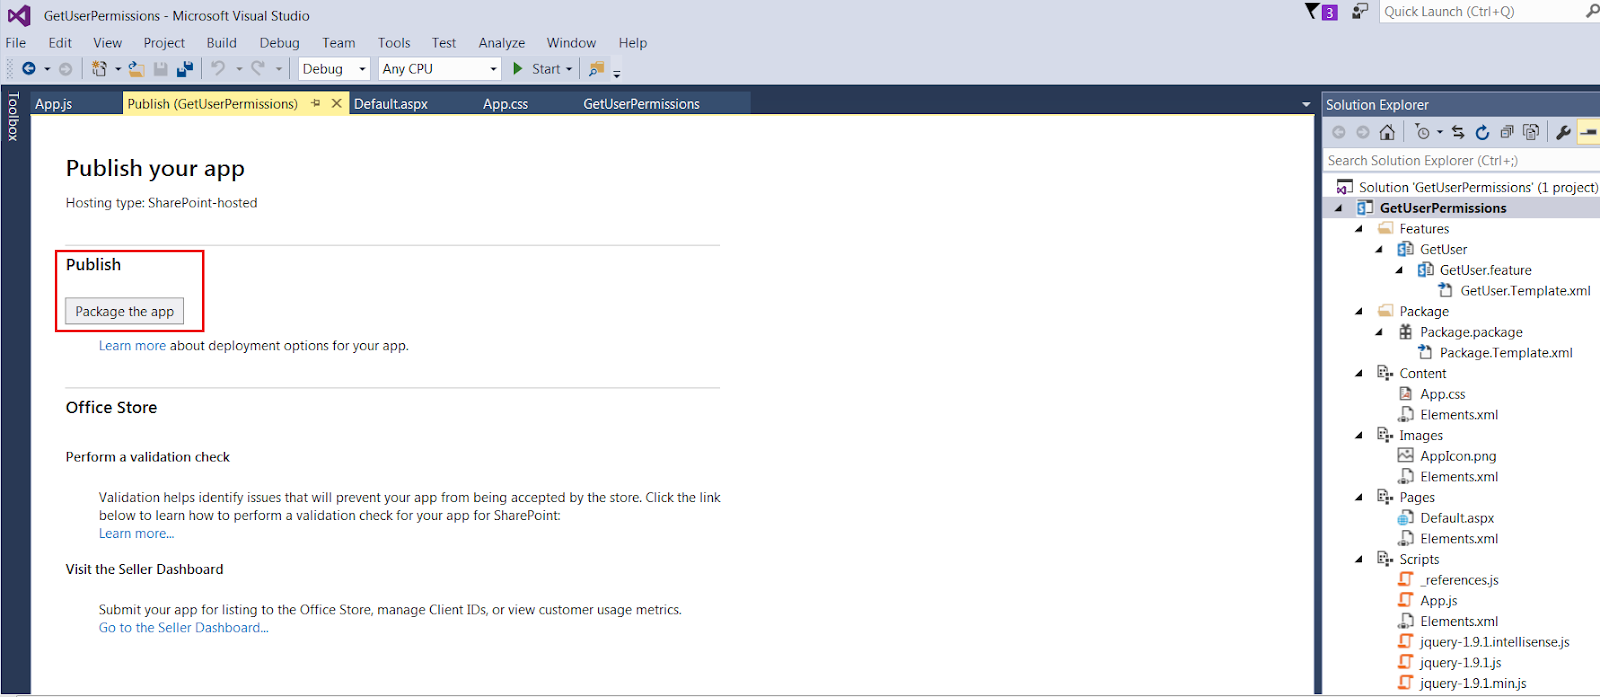
Publish the Add-in


Publish the SharePoint Add-in


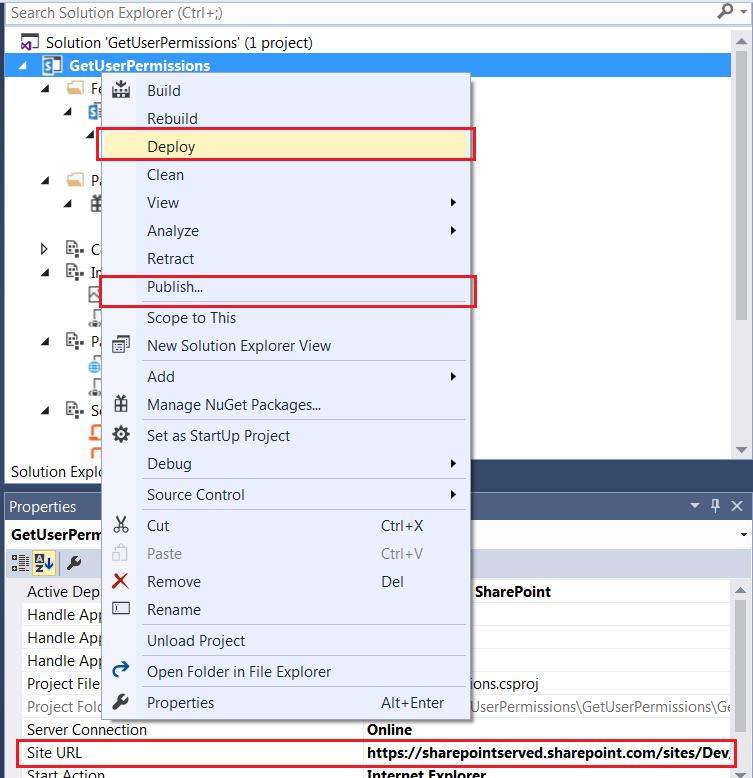
Deploy the Add-in to the developer site.


Deploy the SharePoint Add-in to the developer site


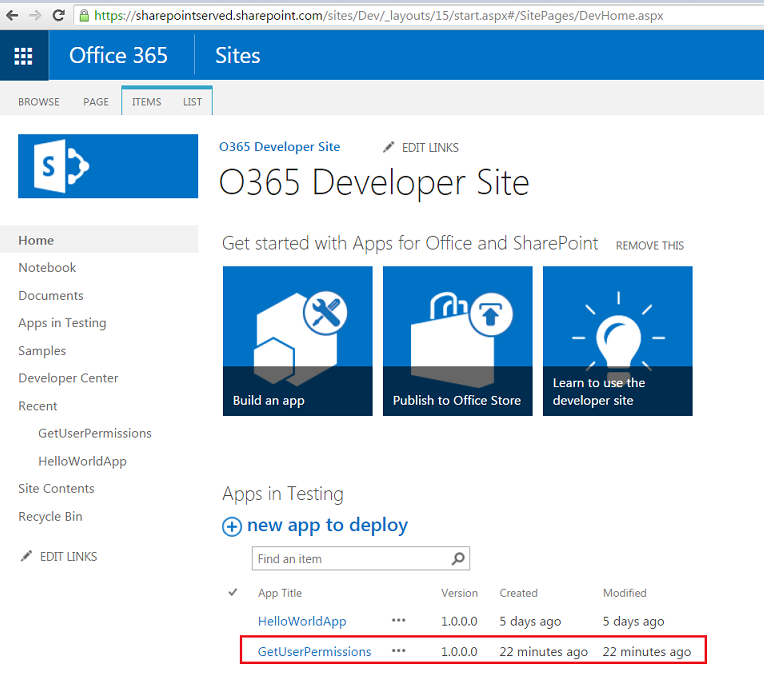
Developer Site home page with the Add-ins in Testing list


Developer Site home page with the Add-ins


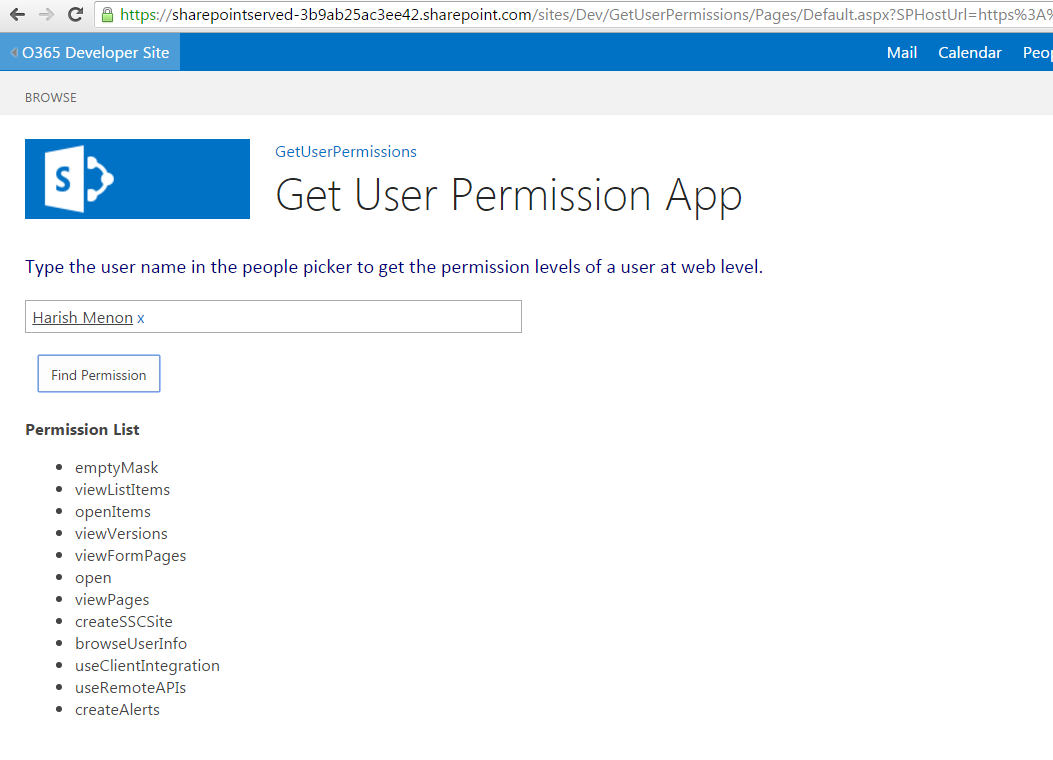
Run the add-in

Note: User running this app should have appropriate permission to get the permission level for other users. A full control permission is recommended in this case.


Run the add-in


Source Code is available at TechNet gallery.

Sunday, January 31, 2016

A different version of this App is already installed with the same version number. You need to delete the app from the site and the site recycle bin to install this version.

Environment: Office365, SharePoint Online, Visual Studio 2015

Requirement: Re-Deploy an SharePoint Add-in into SharePoint Online Developer site

Approach: The Add-in is build successfully, but was getting an error when it is deployed using Visual Studio or added to Apps list in Developer site.

Issue/Error: A different version of this App is already installed with the same version number.  You need to delete the app from the site and the site recycle bin to install this version.

Resolution: We could not delete the app as it was neither in site recycle bin nor second-stage recycle bin. Clean and Retract the app from Visual Studio. Redeploy it again after successful retraction.

Wednesday, January 6, 2016

Add text or image between suite bar in Ribbon

Environment: SharePoint 2013 Enterprise

Requirement: Add text or image between suite bars

Solution:

Edit the master page using SharePoint Designer and add <div> tags with banner text or images as required. The following code snippet is from the out of the box seattle.master page. Text that are highlighted are inserted between the suite bars.

<div id="suiteBar" class="ms-dialogHidden noindex" >
  <div id="suiteBarLeft">
  <div class="ms-table ms-fullWidth">
     <div class="ms-tableRow">
        <div class="ms-tableCell ms-verticalAlignMiddle">
                <SharePoint:DelegateControl id="ID_SuiteBarBrandingDelegate" ControlId="SuiteBarBrandingDelegate" runat="server"/>
        </div>
        <div class="ms-tableCell ms-verticalAlignMiddle" style="text-align:center;font-weight:bold;color:#FF3300;"> [[[ SOME BANNER IMAGES ]]] </div>
        <SharePoint:AjaxDelta runat="server" id="DeltaSuiteLinks" BlockElement="true" CssClass="ms-core-deltaSuiteLinks">
            <div id="suiteLinksBox">
                <SharePoint:DelegateControl id="ID_SuiteLinksDelegate" ControlId="SuiteLinksDelegate" runat="server" />
            </div>                                                                                                              
         </SharePoint:AjaxDelta>
         <div class="ms-tableCell ms-verticalAlignMiddle" style="text-align:center; font-weight:bold;color:#FF3300;"> [[[ SOME BANNER TEXT ]]] </div>
      </div>
  </div>
</div>
Edit the master page using SharePoint Designer
To insert a row below the Suite bar

<SharePoint:ThemedClusteredHoverImage
                                    runat="server"
                                    ……………………
</span>
</div>
</SharePoint:AjaxDelta>
</div>
</div>
<div id="s4-ribbonrow ms-verticalAlignMiddle" style="text-align:center;font-size:large;font-weight:bold; background-color:#6699FF;">[[ SOME SAMPLE TEXT/BANNER ]]</div>
<div id="ms-hcTest"></div>
<div id="s4-ribbonrow">
<div id="globalNavBox" class="noindex">
<div id="ribbonBox">
  <div id="s4-ribboncont">
  <SharePoint:AjaxDelta id="DeltaSPRibbon" BlockElement="true" runat="server">
                <SharePoint:DelegateControl runat="server" ID="GlobalDelegate0" ControlId="GlobalSiteLink0" />
                  <SharePoint:SPRibbon
                                    runat="server"
                                    PlaceholderElementId="RibbonContainer"
                                    CssFile="" >
                                    <SharePoint:SPRibbonPeripheralContent
                                      runat="server"
                                      CssClass="ms-core-defaultFont ms-dialogHidden"
                                      Location="TabRowLeft">
                                    </SharePoint:SPRibbonPeripheralContent>
Insert a row below the Suite bar
P.S. Create appropriate CSS classes and add to the style sheet.